Showing posts with label Nigella. Show all posts

Monday, September 20, 2010

Coffee toffee meringues

This recipe is from Nigella's new book 'Kitchen' that just came out this month.  I made the meringues to use up the egg whites I had left over from making custard base for strawberry ice cream.  I didn't have the hazelnuts (which are optional) and left out the Frangelico (which I do have but wanted to keep it non-alcoholic for myself and my 2.5 yr old son) - though I think both additions would be yummy).  I don't think you need anywhere near 600ml of cream!  I got 8 meringues out of the recipe, and I only had about 150ml of cream, which was enough to top 4 meringues, so 300ml would probably be enough, depending on how much cream you put on each one.  My oven is fan-forced - I didn't reduce the temperature to compensate, and the meringues were done after 35 minutes.  Nigella says just to put the 'merest dribble' of sauce on, which I would agree with, so even though it doesn't make much, you'll probably end up with leftovers.

Coffee toffee meringues

Makes 8-10

For the meringues:
200g caster sugar
50g light brown sugar
2 tsp of instant espresso powder (mine was a bit granular, so I crushed it to a powder first)
pinch cream of tartar
4 egg whites
100g toasted chopped hazelnuts, for topping (optional)

For the toffee sauce:
15g butter
75g golden syrup
25g soft light brown sugar
60ml double cream
2 tsp Frangelico hazelnut liqueur (optional)

For the filling:
600ml double cream

To make the meringues:
Preheat oven to 140C / gas mark 1 and combine caster sugar, brown sugar, coffee powder and cream of tartar in a bowl, and set aside. 
Whisk the egg whites in a dry grease-free bowl until soft peaks start to form.  Begin to sprinkle  in the sugar mix 1 tbs at a time while still whisking, until you have a glossy thick meringue.  This process is much easier with an electric beater, or better still, a freestanding mixer.  You need to allow adequate time between each addition for the sugar to dissolve.  Undissolved sugar in meringue is what causes 'bleeding' - where you end up with syrup running out of the meringue.  You can test whether the sugar is dissolved by rubbing a little of the meringue between your fingers - there should be no graininess.
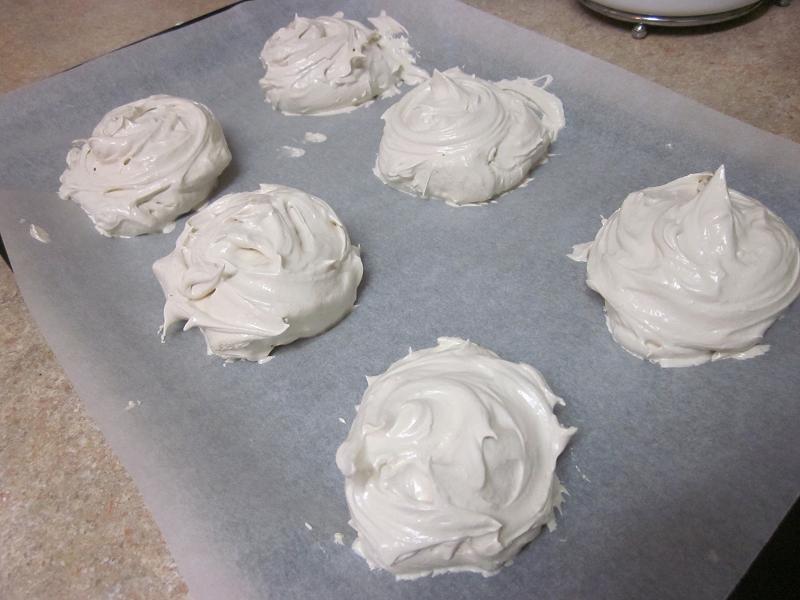
Line a baking sheet.  Spoon out dollops of meringue (about 2 big dessert spoonfuls) to give roughly 8-10 6cm circles.  Spike or fluff the tops to give texture.  I used 2 spoons to transfer blobs of mixture to the tray (one to scoop up some meringue, one to ease it off the spoon onto the tray), then used my clean finger tip to shape them.  Sprinkle the top of each meringue with 1/2 tsp of chopped hazelnuts, saving the rest for serving.
Put in the preheated oven for about 45 minutes, by which time the meringues should be dry on the outside, but still gooey in the middle, and a little fragile to touch.  Take them out of the oven, but do not remove them from the baking sheet.

To make the toffee sauce:
Melt the butter, golden syrup and light brown sugar in a pan over low heat, swirling gently (but not stirring) occasionally, then bring to a boil and let it bubble for 2 minutes.  Take the pan off the heat and whisk in the 60ml of cream and liqueur.  Pour into a small heatproof jug and leave to cool.

To serve:
Whip the cream until firm but not stiff.
Crush a dent into the top of each meringue (the shells will splinter a bit), then split it a little and fill from above with a dollop of cream.  Drizzle on some of the sauce and sprinkle with some of the reserved chopped hazelnuts.

Meringues can be made 1 day ahead and kept in an airtight container.  Sauce can be made a day ahead and kept in the fridge covered with Glad Wrap.  Remove from the fridge 1-2 hours before needed to allow it to come to room temperature.


meringues prior to baking
after baking

butter, golden syrup and brown sugar mixture bubbling
toffee sauce after the addition of the cream

Monday, August 9, 2010

Yet more cupcakes...

Mum asked me to make some cupcakes for her (male) cousin's birthday.  Cupcakes would not have been my first thought when considering what to bake for a man's birthday, but I went with it and was pretty pleased with the results.  The request was for half chocolate, half vanilla.  The vanilla cuppies were made using the usual Nigella recipe.  I have made chocolate cuppies before by substituting cocoa for some of the flour, but decided instead to make chocolate cherry cupcakes from Nigella's 'How to be a Domestic Goddess'.  I haven't made these in quite some time, but they are seriously good.  I found the recipe yielded 18 rather than 12 cupcakes - no matter, more left over for us!  I used Lindt 70% cocoa dark chocolate, which made them very rich.  I couldn't get the stipulated morello cherry jam, so instead used dark cherry jam.

To decorate, I used Cake Mate frosting (the one that comes in a pressurised can) in chocolate fudge, cloud white and blue.  To decorate the chocolate cherry cupcakes, rather than use the star nozzle that comes with the icing, I decided instead to dispense the icing out of the can and use a piping bag and Wilton 1M tip, which I think makes really nice swirls for topping cupcakes.  Unfortunately, it also uses a lot more icing than a smaller star tip, and I found I was only able to ice 9 cupcakes with one can of icing, which made it a pretty expensive way to decorate.  I had intended to ice all the vanilla ones in blue, but was unable to get more blue icing.  I had enough in the cupboard to ice 6 of the 9 vanilla cupcakes I needed using the small star nozzle that comes with the can, and iced the remaining 3 in cloud white icing (I needed 9 vanilla and 9 chocolate cherry cupcakes to fill my cupcake stand which Mum borrowed for the occasion).  I would have preferred to ice the vanilla ones with the 1M tip too, but was unable to get more icing, so had to economise by utilising the smaller tip.  I do think the chocolate ones that were iced with the 1M tip look better though.   

The iced choc cherry cuppies looked so nice with their choc fudge swirls of icing, that I just left 3 of them as they were.  Another 3 I sprinkled with some tiny silver cachous.  The remaining 3 I sprinkled over Wilton blue sprinkles (blue coloured sugar crystals).  To decorate the blue ones, 3 were sprinkled with the silver cachous, 3 had chocolate sprinkles scattered over.  The 3 white cupcakes were decorated with the Wilton blue sprinkles.  On the whole, I thought it looked a tad classier than my mother's planned decoration of Smarties!

My elder son is having a fundraising day next week, where the year 10 students will be selling donated cupcakes to raise money for the RSPCA, so I foresee more cupcake making in my near future!

the completed cupcakes ready in the Cupcake Courier's trays

Wednesday, June 16, 2010

Baci di ricotta


This recipe comes from Nigella's book 'Feast'.  There is also a savoury version of the recipe in the book which I haven't tried, but I've made these sweet ones a few times now.  They have the flavour of donuts with the cinnamon, but I like to pretend they're healthier than donuts - the protein in the ricotta makes them healthy, right?!  I think they're also easier to make than donuts - no yeast, no proving.  I've only ever made these for my husband and kids, and it does take some time to get them done when you are only doing 5-6 at a time and you do need to pay attention with hot fat, so I am not sure if I would be game to try doing them for guests, but then again if you have someone over that is happy to chat while you attend to frying the baci, it would probably be fine.  If serving to guests, you might want to do a bigger batch, as these are pretty popular!   

Makes 30 (I only managed 22 this time - some were a little big)
  • 200g ricotta
  • 2 eggs
  • 75g plain flour
  • 1.5 tsp baking powder
  • pinch salt
  • 1/2 tsp ground cinnamon
  • 15ml caster sugar
  • 1/2 tsp vanilla extract
  • vegetable or corn oil for frying (I used sunflower oil)
  • icing sugar to serve
  1. Beat the ricotta and eggs together until smooth.  Add the flour, baking powder, salt, cinnamon, caster sugar and vanilla.  Beat until the batter is smooth.
  2. Fill a wide shallow pan with about 2cm of oil and heat until 160C (or until it sizzles when some batter is dropped in).  I normally do use a fry pan to make these, but this time I used my deep dryer.
  3. Drop rounded teaspoons of the batter into the pan, about 5-6 at a time.  Cook them until golden brown (about 2 mins), then flip them over using a slotted spoon and cook the other side for around a minute until brown.  I used 2 teaspoons to try and shape the balls a bit before dropping them into the oil, but as you can see, mine are never particularly round.  Once they have puffed up and are dusted with icing sugar, I don't think it really matters much.  They taste good anyway!                                          
  4. Use the slotted spoon to remove the baci from the oil, allowing the oil to drip back into the pan, and place them on some paper towel to drain.  Pile them onto a plate or bowl, and dust with icing sugar to serve.

Thursday, May 13, 2010

Bread and butter pudding


Bread and butter pudding is a part of many people's childhood memories.  I don't believe I ever had the pleasure of eating this dessert as a child; I don't recall my mother ever making it.  She didn't tend to make a lot of sweet things for us to have at home though.  Occasionally we were given homemade biscuits or slice for afternoon tea, but rarely did she make dessert for the family unless there were guests coming over.  I believe the first time I tasted bread and butter pudding would have been at a restaurant, where it seemed for a while to gain some popularity on restaurant menus back in the 90s, and still does appear on some.

The recipe I use is the ginger-jam bread and butter pudding from Nigella Bites.  The recipe stipulates brown bread, which is surprisingly good, and you can convince yourself it is healthier that way, but this time I have used white bread as that was what I had to hand.  You can change the ingredients around to suit yourself.  If you don't like the idea of the ginger jam, you can use whatever flavour you like.  I have done this recipe before with apricot jam, and I substituted ground cinnamon for the ground ginger in the topping, and that was delish.  If you don't want to use rum for soaking the sultanas, you could try using juice instead to help them plump up.  I particularly like the crunch the demerara sugar gives to the top.   Keep an eye on it towards the end of the cooking time - my exposed crusts were starting to get too brown, so I did cover the top for the last 5 minutes of cooking, but probably should have covered the top earlier than that.  If they are starting to brown too much and you still have some time to go, maybe cover the top and then remove it for the final 5 minutes so the top will still be crunchy.

You can find the recipe here.

Monday, February 15, 2010

My little boy turns 2!

My little boy turned 2yo today! My sister-in-law and her partner were visiting from the other side of the country, and were here in time for his birthday, so I decided to have a little family party for him at home.

Here is the menu I settled on... (mostly a repeat of the menu I did in December for visiting friends with a few extras).

Starters
  • Turkish bread
  • red kidney bean dip
  • fried halloumi with lemon juice and pepper
  • cucumber and pomegranate salad
  • herbed bulgar wheat and nut salad
  • olives

Main
  • lamb and apricot tagine
  • couscous
  • steamed green beans
  • roasted beetroot (courtesy of my brother)
  • carrots (again, courtesy of my brother) - they had some yummy dressing on them
  • potato bake (courtesy of my mother, who seems to think potato bakes goes with any menu)

Dessert
  • cupcakes
  • butterfly cakes with lemon curd (made by my mum)
  • birthday cake (white chocolate mud cake)
  • baked mango cheesecake

It may seem a strange menu for a 2yo's birthday, but he was the only little kid there, and he eats most of that stuff anyway :)


Fried halloumi dressed with lemon juice and black pepper - I love this stuff!


Red kidney bean dip - I was debating making hummus, but this is more yummy in my opinion. People could spread it on their Turkish bread. Recipe below.


Herbed bulgar wheat and nut salad - this turned out nicer than last time, so I had to get a new photo. Recipe is here (along with the recipe for cucumber and pomegranate salad).


The carrot and beetroot dishes provided by my brother :)

Red kidney bean dip

This recipe is from Nigella's Feast, which along with the herbed bulgar wheat and nut salad and cucumber and pomegranate salad form part of the 'mezze feast' menu. Nigella says to think of it as a 'terracotta, sweet and grainy version of hummus' - as much as I love hummus, it is quite bland compared to this. I love the spices in it. I've made this dip a few times before, and each time think I will put less garlic in next time, but I always forget and as I have a thing about not writing in books, so I don't make a note of it - argh!).

  • 1 large onion
  • 3 fat cloves of garlic (I actually think half this amount would be plenty - I keep forgetting to cut the amount down. It does pack a garlicky punch with this quantity!)
  • 45 ml of olive oil
  • 410g can of red kidney beans, liquid reserved
  • 15ml tomato paste
  • ½ tsp ground cumin
  • ½ ground coriander
  • ¼ tsp ground cinnamon (I upped this to ½ tsp)
  • juice and zest of 1 lime

Peel the onion and garlic and process them until finely chopped. Heat the oil and cook the onion and garlic until soft and golden. Add the kidney beans plus their 'gloop' (liquid) and stir in the tomato paste and spices and cook for a few minutes.

Zest the lime and reserve in a bowl for later, then juice the lime, adding it to the kidney bean mixture. Take the pan off the heat, and when it has cooled somewhat, process until it forms a bumpy puree. When it is cool, serve in bowls, sprinkled with lime zest.


Dessert is served... From front to back: butterfly cakes with lemon curd made by my mum, cupcakes, white chocolate mudcake (birthday cake - tractor has been removed), and baked mango cheesecake. (You can see the new tagine I used for serving the lamb and apricot tagine in the background - it is made by Emile Henry and the colour is fig).

Cupcakes

These were made using the same Nigella recipe as in this post. It comes from How To Be A Domestic Goddess and it is my favourite cupcake recipe - really simple, tastes beautiful, and will keep well in the fridge for several days if needed.

I cheated with the icing and bought Cake Mate icing - the pressurised stuff in a can that comes with different nozzles, already coloured blue. It just saved worrying about how buttercream would hold up on a hot day, no worries about ending up with aqua not blue icing because of the butter, and coped better with heat than the Betty Crocker icing I sometimes use (which colours well but gets very soft in the heat, and if you want to pipe it, you need to add a lot of icing sugar to the mixture first to get it stiff enough).


Fresh cuppies


Cupcakes iced using CakeMate frosting in a can using the star tip provided


The cupcakes with their 'little star' collars (from Robert Gordon)

Mango cheesecake

I love this recipe. The mango puree gives it a more mousse-like texture, and baking it in a water bath helps to keep the texture silky. It is a Nigella recipe which appeared in Australian Delicious magazine (Dec 2004 / Jan 2005 issue).

Base
  • 250g digestive biscuits
  • 110g unsalted butter, softened
  • 40g soft dark brown sugar

Filling
  • 4 small mangoes (to make about 2 cups of puree), plus extra thinly sliced mango flesh to garnish
  • 680g full-fat cream cheese
  • 1 cup (220g) caster sugar
  • 6 eggs
  • juice of half a lime

Preheat oven to 170C.

Blitz the bicuits in a food processor until they are almost fine crumbs, then cut the butter into pieces and add with the brown sugar. Process again until the mixture starts to clump together. Press the mixture into the base of a 24cm springform tin (I don't own this size, so I use a 22cm tin). Refrigerate.

Peel and cut the flesh from the mangoes (over the processor bowl to catch the juices), then puree until smooth. Add the cream cheese and blend. Add the caster sugar, and with the motor running, break the eggs one at a time down the tube of the processor. Lastly, add the lime juice and blitz again until smooth.

Wrap the pan in a double-layered piece of extra-wide foil; sit in a roasting pan. Spread the filling over the base and smooth. Pour boiling water to come halfway up the sides of the pan.

Bake for 1 hour and 45 minutes, or until filling is set with only a msall amount of wobble in the centre (it will keep cooking as it cools). Remove from bath and foil and cool on a wire rack. When cool, cover loosely and refrigerate overnight.

Garnish with the extra sliced mango to serve.


The birthday cake
For my little one's 1st birthday, I baked two white chocolate cakes and layered them on top of each other to get extra height (see pics of that cake in this post). This year I just did a single layer, again using the white chocolate mud cake recipe from Exclusively Food. Rather than ice it with buttercream again as I did last year, this year I decided to follow the recipe for white chocolate and sour cream ganache. When I tried to ice the sides with the ganache, I found it a little too translucent for my liking, though it probably would have become more opaque as it set. I wasn't feeling very creative this year, so I'd opted for a toy tractor to decorate the cake, and wanted to create a ploughed field. So as I wanted a brown colour for the top for the soil, I added one square of 70% cocoa Lindt chocolate to the ganache, and iced the top and sides. Unfortunately it took on a slightly marbled appearance where there had already been some white chocolate ganache (not in a good way). I let the chocolate start to set, then ran one edge of my Wilton decorating triangle over most of the surface to get the ploughed look. I then coloured some coconut green for grass and sprinkled that at the side of the field, and when it was completely set, I added the tractor. I also iced my son's name on the cake using Queen white chocolate fudge icing (comes in a tube with a fine nozzle for writing).

Unfortunately I didn't get a photo of the candles alight, but I used 'Angel Flames' candles - the flame is the same colour as the candle.


Thursday, December 31, 2009

Christmas leftovers

As usual, I cooked way more turkey on Christmas Day than we needed, because I love having leftovers. Most of this has been eaten on sandwiches with a generous amount of my homemade cranberry sauce. With the last bit left over, I thought it was best to serve it hot as it was by then a few days old, so I chose the recipe below from Nigella Christmas. 'Twas good.

I changed the quantities of egg, sour cream and stock. I made up 1/4 cup of chicken stock, with the intention of measuring out 30ml, but got distracted and poured the lot in, so ended up adding an extra egg and a bit more sour cream. Those quantities worked quite well though, I thought.

Ed Victor's Turkey Hash
Serves 2 as a main, or 4 with green salad and a baked potato
  • 50g flaked almonds, toasted
  • 30ml olive oil
  • 15g butter
  • 1 onion, chopped
  • 2 capsicum, deseeded and chopped into pieces approx. 1 x 2cm
  • 1 garlic clove, minced
  • 250g turkey breast, shredded
  • 75g pitted black olives
  • 30ml sour cream (I added about 45ml)
  • 30ml leftover turkey stock (I used 1/4 cup chicken stock)
  • 1 egg (I used 2 eggs)
  • few dashes of Tabasco sauce, or to taste (I omitted this)
  • 75g flaked Parmesan
  • chopped flat-leaf parsley, to garnish (optional)
Heat the butter and in a pan and add the onions and capsicum. Stir over a medium to low heat for about 10 minutes. Stir in the garlic, then stir through the turkey and cook until piping hot. Add the almonds and olives and stir through.

Whisk together the egg, sour cream, and stock. Pour into the pan and give a quick to stir to combine along with the Tobasco sauce. Add the Parmesan and stir until starting to melt. Sprinkle with chopped parsley and serve.


Friday, December 25, 2009

Chocolate malteser cake

This is the cake I chose to bake for my hubby's birthday. I have made it before a few years ago, and remember thinking it was a little dry/ rubbery, but thought perhaps I had done something wrong and should give it another go. Unfortunately, I still wasn't happy with it. The flavour is great, but it does seem rubbery and not finely textured. On looking at the recipe again, I think it is because the cake doesn't have much fat added to it in the form of butter or oil, which I guess is great from a dietary point of view, but from a pure enjoyment viewpoint, it lets the side down a little. Still, the flavour is so good I am determined to try it again soon, but rework the quantities of ingredients to something closer to a Victoria sponge cake. If you like Maltesers, then you'll love the buttercream icing. Making a normal chocolate sponge cake and icing it with the choc-malt buttercream icing would be a delicious alternative to making the sponges as they are in this recipe.

I actually found it a little better the next day - whether this was because I had had time to get over my disappointment, or whether the texture did indeed improve overnight, I am not quite sure. My hubby and the boys loved it anyway, and it is a very presentable cake.

For the cake:
  • 150g soft light brown sugar
  • 100g caster sugar
  • 3 eggs
  • 175ml milk
  • 15g butter (yes, that is correct)
  • 30ml Horlicks
  • 175g plain flour
  • 25g cocoa, sieved
  • 1 tsp baking powder
  • 1/2 tsp bicarb soda
Preheat the oven to 170C. Grease and line two 20cm loose-bottomed sandwich tins.

Whisk the sugars and eggs until light and frothy. Assuming you have a free standing mixer, while this is happening, heat the milk, butter and Horlicks in a saucepan until the butter is melted and the mixture is hot, but not boiling. Beat the Horlicks mixture into the eggs and sugar, then fold through the remaining dry ingredients. Divide the mixture evenly between the two tins and bake for around 25 minutes, or until the cakes spring back when lightly pressed. Cool on a rack for 5-10 minutes before turning the cakes out of their tins.

For the icing:
  • 250g icing sugar
  • 1tsp cocoa
  • 45g Horlicks
  • 125g soft unsalted butter
  • 30ml boiling water
  • 75g Maltesers
Put the icing suagr, cocoa and Horlicks into a food processor bowl and blitz to remove any lumps (saves sifting - yay!!!). Add the butter and process again. Pour the boiling water into the funnel with the motor running until a smooth buttercream has formed.

When the cakes are cold, ice one cake with half the icing, sandwich the other cake on top and spread with the remaining icing. Decorate with the Maltesers.

Source: Feast, Nigella Lawson.


I had to include this pic as I love my Nigella loose-bottomed sandwich tins! I love that they have the dimensions printed on the side. I wish all cake tins had this.


ready to bake; freshly baked


Friday, August 7, 2009

Silicone moulds

I recently purchased these TreeParty Design silicone moulds. They look exactly like some NordicWare deigns, but with the flexibility (no pun intended!) of silicone - so they can be used in the oven, the fridge, or the freezer. I decided to try them out using my favourite cupcake recipe - from Nigella's 'How to be a Domestic Goddess'. This recipe is incredibly quick and easy, and results in cupcakes which are moist and delicious, and keep well for about 5 days in the fridge - though usually they don't last long! I've been using this recipe for about 5 years now. I did try one of the cupcake recipes from the Crabapple Bakery book, but it was extra work with separating eggs, and the end result wasn't as good as Nigella's much simpler recipe.

The 'blossom flower' pan features miniature versions of some of the popular NordicWare bundt tins - including the cathedral, star and original bundt designs that I own. The silicone of this mould is thinner than the bugs one, but I think as the designs are quite small and delicate, this makes it easier to unmould the cakes without damaging the designs. The bugs are a lot bigger, and so the the thicker silicone gives the shapes more support.

If you haven't cooked with silicone before, then it is important to know you need to put your mould on a tray to support the mould when transferring it into the oven. Silicone has non-stick properties, but I like to spray the moulds lightly with oil to ensure easy release.

I managed to fill all the blossom cavities and all but one of the bug cavities with one quantity of the cupcake mixture. Once baked, the cakes released easily, but needed some minor surgery to cut off the rounded tops so that the cakes could sit flat on a plate (also had the added bonus of yummy offcuts :p!). The cakes from the blossom mould lost a bit of definition, which was really just the result of baking a batter that rises in such small moulds - they didn't come out looking as perfect as I'd hoped, but once trimmed and dusted with icing sugar, they looked quite presentable. The bugs also lost a bit of definition, but you could decorate them with icing to highlight the designs more. I chose just to dust them with icing sugar too.

I think I would like to try moulding chocolate in the blossom mould. With the size of the cavities, I think it would be perfect for that, and it would highlight the designs more. But I was pretty happy with the end results, and they were certainly tasty. The cupcakes have such a nice vanilla flavour, and are so moist, you don't really miss having no icing.

The recipe

125g butter
125g caster sugar
125g SR flour
½ tsp vanilla extract
2 large eggs
2 tbs milk

Preheat oven to 200ÂșC. Line a 12 cavity muffin tin with cupcake cases.
Add all ingredients except for the milk into the bowl of a food processor and blitz to combine. Pulse while adding the milk down the funnel. (You can also do this the more traditional way of creaming the butter sugar, beating in the eggs, and then folding through the flour and milk).
Divide the mixture between the cupcake cases.
Bake for 15-20 mins, or until golden and firm.

NB I baked the blossom mould cakes for about 13 mins, and the bugs for about 20 mins.


Lightly oiled moulds; filled moulds
(I tapped the moulds once filled quite firmly on the bench to try to get rid of any air pockets that would spoil the detail of the designs)


the cooked blossoms and bugs


The cakes cooling - you can see the bases of the designs would need to be trimmed if they were to sit flat on a plate.


performing surgery to allow the cakes to sit nicely


the trimmed cakes


Although my intial reaction after turning the cakes out was that I might not use the blossom mould again for baking cakes (but would use it for chocolate instead), I think I was being overly critical. After I went back and looked again, the little cakes really did look quite pretty once they were trimmed and dusted (and for very little effort), and they tasted so delicious with their eggy vanilla flavour. Plus they are a very appealing size being just bite-sized - I can imagine them being quite popular at a party when people often just want small nibbles so they can try a bit of everything or so that they feel they're not over-indulging.


I love the shapes left in the icing sugar!